How To Reset a Password in Windows 10 Without Using a Reset Disk

If you forgot your password on a Windows 10 PC and you cannot reset it using Microsoft’s typical processes, you can use this moderately straightforward routine.

The idea is to replace the EASE OF ACCESS program (designed to help people with a disability) with the CMD.EXE and then use that to create a new account.

The details are:

  1. Boot off a Windows 10 DVD (or USB)
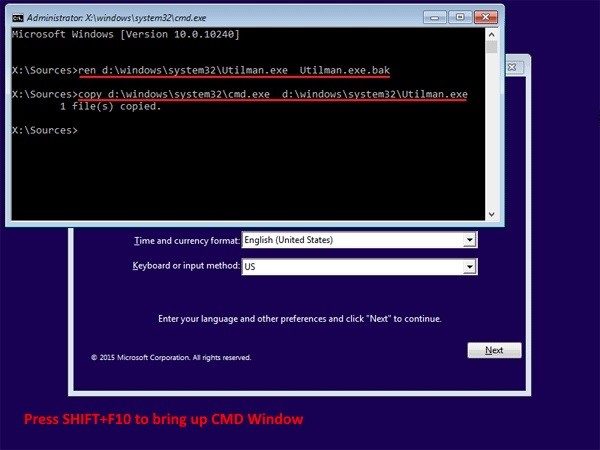
  2. When the WINDOWS SETUP screen appears, press SHIFT+F10 to launch a CMD window
  3. Type ren d:\windows\system32\utilman.exe utilman.exe.bak and press the ENTER key
  4. Type copy d:\windows\system32\cmd.exe d:\windows\system32\utilman.exe and press the ENTER key
  5. Exit the Windows 10 setup (just power down)
  6. Boot normally to your hard drive
  7. At the Login Screen click the EASE OF ACCESS icon (beside the Power icon in the bottom right corner of the screen).  Because of step 4, this will launch a CMD window
  8. Type net user test /add and press the ENTER key
  9. Type net localgroup administrators test /add and press the ENTER key
  10. Press ALT+F4 to close the CMD prompt
  11. Click the Power icon (bottom right corner of the screen) and select RESTART
  12. Sign in as TEST without a password

This created a local administrator named TEST.  If you are on a domain use the username .\test and no password.

At this point you are a full local admin, so you can reset any local account password or access any file on the machine.  If you logged in with a Microsoft Account or a Domain account, you will not be able to reset the users password but you will have full access to the files so you are not stuck.

A longer, prettier version of this is available at chntpw.com/reset-forgotten-windows-10-password .

Accessing a NAS from a Windows 11 PC

After I bought a new laptop with Windows 11, this machine had trouble accessing my Western Digital Network Attached Storage Drive. I typed \\mybooklive\public in explorer and got a network error. Windows cannot access \\mybooklive\public Check the spelling of the name. Otherwise, there might be a problem with your network. Try to identify and resolve network problems, click Diagnose. Error code: 0x80070035 The network path was not found.

If your NAS doesn’t appear in File Explorer or fails to connect, Windows 11 24H2 security changes (like mandatory SMB signing) or disabled discovery may be the cause. These steps help you enable discovery, adjust SMB settings, and connect directly.

On Windows 11 Home you can run these two commands in powershell run as administrator.
Group Policy Editor not available in Home edition

Set-SmbClientConfiguration -RequireSecuritySignature $false
Press Enter, confirm the change entering Y.
Set-SmbClientConfiguration -EnableInsecureGuestLogons $true
Press Enter, confirm the change entering Y.

Install App installer and WinUI BLM on Windows 10 LTSC

To install WinUI packages on Windows 10 LTCS, Winget App Installer and the Berryworld Software certificate need to be installed. 

Error when you don’t have App Installer: 

“Windows can’t open this type of file .msix” 

To install the WinGet App Installer 

Complete internet document used (for reference):

[Guide] How to install Winget on LTSC (IoT) without the Windows Store 

My motivation for writing this is because I’ve spent many hours troubleshooting errors that came with installing Winget due to Microsoft’s lack of instructions for their own Enterprise distributions. I built this step-by-step guide by digging through GitHub Issues and the excellent MyDigitalLife forums. 

Make sure to refer to the GitHub repo for an updated guide! I won’t be maintaining this post. 

⚠ Manual installation does not receive auto updates, but is the only option without installing Windows Store on LTSC ⚠ 

Installing Dependencies 

  • Open an elevated (administrator) PowerShell prompt and keep it open throughout this guide. 

VC++ v14 Desktop Framework Package 

  1. Download the correct VC++ v14 Desktop Framework Package for your architecture. 
  1. Install with: Add-AppxPackage -Path “PATH TO FILE” 

Microsoft.UI.Xaml.2.7 

Winget v1.2.10271 introduced a new dependency for Microsoft.UI.Xaml.2.7 which you have to install manually. The solution to install this on LTSC is not pretty, but it works. 

  1. Download the Nuget package manually by clicking “Download package” on the right hand side under the “About” section. 
  1. Change the file extension from .nuget to .zip and open it with any archiving program. 
  1. Within the archive navigate to tools\AppX\[YOUR ARCHITECTURE]\Release and extract Microsoft.UI.XAML.2.7.appx. 
  1. Install with: Add-AppxPackage -Path “PATH TO FILE” 

#1861 

Installing Winget 

0. Make sure all dependencies are installed before doing this! 

  1. From the latest release download the .msixbundle install- and .xml license file: https://github.com/microsoft/winget-cli/releases 
  1. Install with: Add-AppxProvisionedPackage -Online -PackagePath “PATH TO MSIXBUNDLE” -LicensePath “PATH TO XML” -Verbose 
  1. Wait for the install to finish and you’re done. You may need to restart the terminal, or reboot your pc. 
  1. Verify that the installation succeeded by running winget in PowerShell. If no errors occur then you’re done! 

Make sure to refer to the GitHub repo for an updated guide! I won’t be maintaining this post. 

Windows shell commands

In Microsoft Windows you are able to access some special folders and start some special application from Run… and then type a magic command.

One of these folders is %appsfolder% with a list of installed applications. From this folder you are able to create shortcuts etc. This folder can be accessed using the Windows Run command box and typing “shell:appsfolder”.

When you want to open the folder or run another command without first clicking Windows, Run: You are also able to execute the command from a command prompt using “start” and then the magic words you have to type in the run command box.

for example typing “start shell:appsfolder”

Allow remote access to IISExpress for development in VS

When you want to test your website and check it remote you see the error:

Bad Request – Invalid Hostname


HTTP Error 400. The request hostname is invalid.

First thing to do is to find the correct applicationhost.config file. This file can be found in

the solution directory under .vs/<Solution name>/config. This file contains an entry under the tag <sites> for the site with the config that is applied in IISExpress.

This enables binding for the IIS:

    <bindings>
      <binding protocol="http" bindingInformation="*:29136:localhost" />
      <binding protocol="https" bindingInformation="*:44343:localhost" />
    </bindings>

Above configuration only allows localhost to access the IISSExpress site.

Change it to:
        <bindings>
          <binding protocol="http" bindingInformation=":29136:" />
          <binding protocol="https" bindingInformation=":44343:" />
        </bindings>
to allow remote machines to access the site.

Miljoenen tonnen CO2 uitstoot niet geregistreerd

In de voetnoot van de brandstoffenlijst lijkt te staan dat CO2 uitstoot van Biomassa centrales niet hoeven te worden geteld volgens het verdrag van Kyoto. Volgens mij gaat dit dan dus voorbij aan de werkelijkheid.

Nederlandse lijst van energiedragers en standaard CO2 emissiefactoren (rvo.nl)

Merendeel van alle energieopwekking in Europa is klimaatneutraal dus vanwege het simpele feit dat we het gewoonweg niet tellen:

The Millions of Tons of Carbon Emissions That Don’t Officially Exist | The New Yorker

The Kyoto approach has failed | Nature

adb server’s $ADB_VENDOR_KEYS is not set

While debugging an Android application I wanted to connect to a new device. I factory reset the device and wanted to deploy the application with adb (Android Debug Bridge).

Response from adb after run android –livereload was:

adb.exe: device unauthorized.
This adb server’s $ADB_VENDOR_KEYS is not set
Try ‘adb kill-server’ if that seems wrong.
Otherwise check for a confirmation dialog on your device.

My colleague had the same experience earlier and didn’t know how to solve this. The first entries in google didn’t provide a correct solution.

I tried several first like removing the .android folder from my profile. All effort was unsuccessful.

The solution simply was to allow USB connection on the device via USB debugging in developer options on the Android Device.

Some of these settings are hidden or managed by your organization

At the office I had a problem with my developer PC. It was running Windows 10 and for some Visual Studio projects (UWP) etc. I had to set my machine to Developer Mode.

This setting can normally be set in Windows Settings, Update & Security, For Developers…

However….

On my machine this window stated that some of these settings are hidden or managed by your organization.

So I called my organization but they were unable to help me out. No one knew the cause of this message. No policy setting was set, I was administrator on the machine etc…

Call closed…

Problem not solved…

I needed this fixed so I gave it my best try… Maybe google could help me out. After a few searches I got the idea the message could erroneously be set by Windows, not because of company policies. I looks like some combination of settings and Windows 10 updates can have this situation as a result.

Walking through various forums with all kind of solutions, there was one simple solution that helped me out…

Remove all settings in the registry key except for one.

Make sure the key Computer\HKEY_LOCAL_MACHINE\SOFTWARE\Policies\Microsoft\Windows\Appx looks like this:

In my case it also contained the key AllowDevelopmentWithoutDevLicence set to false. I completely removed that key and set AllowAllThrustedApps to true. Rebooted my machine.

Problem solved, case closed.